Camera Control in ABZÛ
Last time we wrote about our Fluid Controls, which touched on our camera. Today we’ll expand on that and explore how the camera works in ABZÛ.
Our design for the fluid camera started with these goals:
We expanded on the basic ideas that John Nesky developed for Journey, while also responding to wrinkles introduced by freeform-swimming:
Our design for the fluid camera started with these goals:
- Don’t roll with respect to the horizon, even as the diver rotates freely.
- Mirror the fluidity of the diver’s movement while still following predicatively rather than lagging behind.
- “Just work” from any direction with a wide gamut of unusual scene collision arrangements without needing lots of designer annotation.
- Seamlessly move in and out of in-game cutscenes.
We expanded on the basic ideas that John Nesky developed for Journey, while also responding to wrinkles introduced by freeform-swimming:
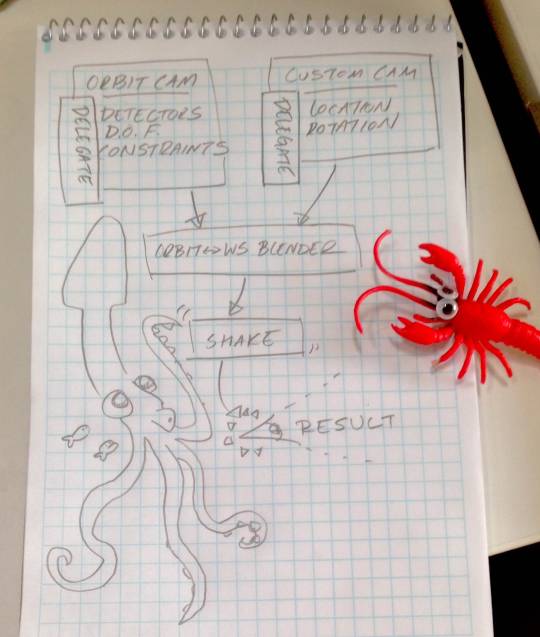
Orbit Camera
The primary module which runs the interactive camera during gameplay. We use a three-step pipeline: Detectors, DOF Solvers, and Constraints.
Detectors gather data from the scene, sanitize it, and extract the camera-specific inputs: player input, diver kinematic-prediction & acrobatics (as described in the last article), 2D forward direction, the follow direction and strength, gameplay boundary conditions, collision neighborhoods & distance-fields, designer hints, and special events (surface-breaching, flipping, boost-chaining, going-over-ledges, riding creatures, etc).
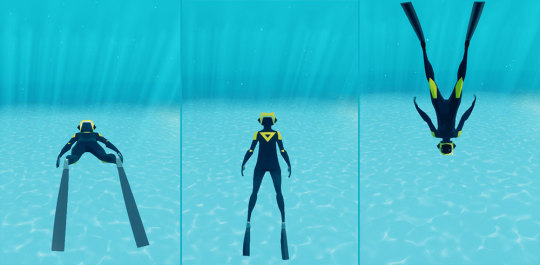 The 2D Forward Detector generally picks the direction that the diver is pointing. However when the diver is pitched up or down, this direction becomes ambiguous. Therefore, the detector uses her belly or back direction in those cases.
DOF Solvers compute the main Degrees of Freedom:
- Tracking Position - the world-space location we’re looking at, usually the diver’s collar-bone.
- Pitch - looking up and down, deadzoned around a slightly-down pitch.
- Yaw - looking left and right, pulled along like a leash.
- Distance - pulled-back from tracking position, annotated by level designers.
- Framing - where the tracking position is placed on-screen, typically positioning the diver according to the rule of thirds.
The DOF is converted to a world-space POV (”point-of-view”) representing the actual location and rotation of the camera. The rotation, represented as a quaternion, is computed using euler-angles, and the location is the sum of the tracking position and a rotated local vector which combines the distance pull-back and framing offset (X=forward and Z=up):
POV.Rotation = Quat.Euler(0, DOF.Pitch, DOF.Yaw)
// convert the screen-space framing into a
// world-space “parallax” offset using the camera’s
// field of view and the screen’s aspect ratio
TanFOV = Math.Tan(0.5 * DegreesToRadians(FieldOfView))
ScreenToWorld= DOF.Distance * Vec(TanFOV, TanFOV/AspectRatio)
Parallax = ScreenToWorld * DOF.Framing;
// Pullback in the local forward/backward direction (X),
// and parallax in the side-to-side directions (YZ)
LocalOffset = Vec(-DOF.Distance, Parallax.X, Parallax.Y)
POV.Location = DOF.Tracking + (POV.Rotation * LocalOffset)
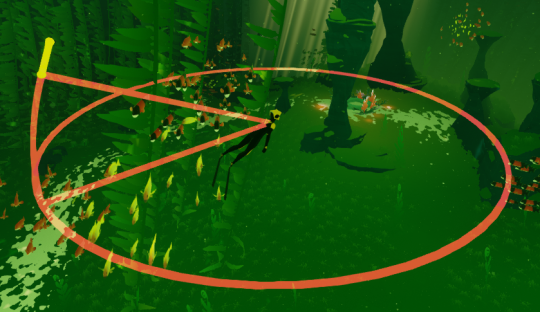
Screenshot of our in-game Camera DOF Visualizer. The yellow bit is the framing parallax (here placing the diver in the bottom third of the screen).
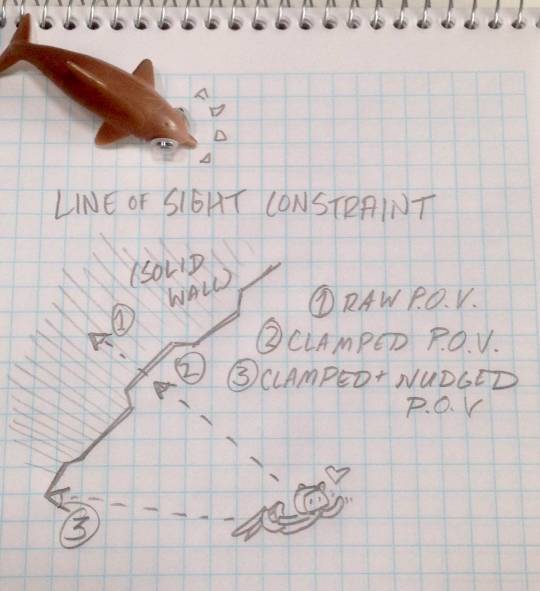
Constraints take the DOF results and nudge and/or clamp them to safe ranges to account for: line-of-sight occlusion, water-surface breaching, smoothing (using critically-damped springs, to avoid acute speed-hitches), and “custom camera” matching (discussed later).
The orbit camera behaves a little differently at different times. For instance, when the Diver flips, we don’t want to swing the camera around with her. Therefore, each step is post-hooked by an override. These are ordinary game objects which implement an abstract interface with various optional methods to override default orbit behavior. For the programming curious, it looks something like this (though it’s a bit more complicated in production):
interface IOrbitCameraDelegate {
OverrideCamTracking(Camera* Cam, vec3* InOutLocation)
OverrideCamFraming(Camera* Cam, vec2* InOutLocation)
OverrideCamPitch(Camera* Cam, float *InOutPitch)
OverrideCamYaw(Camera* Cam, float* InOutYaw)
OverrideCamDist(Camera* Cam, float* InOutDist)
}
Delegates default to the diver, but can also be set explicitly in scripting for special moments. Structuring these overrides to use ref-arguments instead of return values was helpful to perform blending or hysteresis in the delegate itself.
Custom Camera
We use custom cameras for scene bookending, cutscenes, authored-animations, and other special-cases where we need total control, without any side-effects, smoothing, or constraints. The POV is supplied by a second optional delegate:
interface ICustomCameraDelegate {
CamBlend(Camera* Cam, float* OutTime, EasingType* OutEasing)
CamPOV(Camera* Cam, vec3* OutLoc, quat* OutRot)
}
The advantage of an abstract interface is that anything can be a custom camera. It helped us consolidate our scripting to actors, without having webs of tightly-coupled components.
Orbit <-> Custom Blender
Pure Orbit: there’s no custom camera, so we just pass through the orbit result (99% of the time).
Pure Custom: like pure orbit, we just pass through the custom camera, however we also update the orbit constraints to match the custom camera’s rotation, so that when we return it won’t swing wildly and induce simulation sickness.
Blending: when a new custom camera is set or unset we bookmark the current blended POV (because we might be transitioning from another custom camera, not just the orbit) and then blend in or out of the custom camera. There’s lots of tricky bits here that are necessary to keep the camera fluid:
- Extrapolate the blend-from location & rotation using the intial blended POV speed so there’s no speed hitches during the blend.
- Apply easing to the interpolation so it’s not an unnatural linear movement (we use smoothstep by default, but this can be overridden by the custom camera delegate).
- Don’t interpolate along a straight line - in general we compute cubic hermite splines whose tangents are scaled by the amount of rotation so we don’t feel like we’re “cutting across corners.”
- Make sure the rotation axis is consistent. In general, we rotate along the smallest arc using slerp, however, e.g., if we started rotating clockwise, then we make sure to keep rotating that way even if the smallest arc changes mid-transition. In 3D we detect this by ensuring that the dot-product of two consecutive rotation axes is positive.
Shake
Shake is applied after all the other processes as a “post effect” so that we avoid feedback between the shaking parameters and the baseline POV. We support two kinds of shakes: a simple-shake which is easy to script, and a custom shake which takes a curve asset for syncing up with animations.
Conclusion
I hope you enjoyed our whistle-stop tour. It all seems pretty straightforward in hindsight, but we also experimented with many more false-starts and nice-in-theory-bad-in-practice prototypes along the way. As with the diver movement, each module in the final build had about a bazillion tuning parameters that were constantly mixed and monitored throughout the project.
As always, if you have any questions or would like to follow up for more detail, you can ping me @xewlupus – we look forward to feedback on how our devblogging efforts can better serve fellow developers :)